Building Raised Beds with Railway Sleepers
Hello and welcome to our Articles section. Here we will bring you regular articles each month covering a range of projects showing how best to put our building and garden supplies to best use.
We have nearly 20 years experience of helping builders and homeowners improve their gardens and outdoor spaces, providing them with an ever-increasing range of materials, from mulch and soil conditioner to sand, paving slabs and railway sleepers.
In this first article we introduce raised beds into your garden, exploring the benefits of raised beds, types of vegetation you can grow in them and how to go about building them yourself. All products outlined in this article can be sourced from Madingley Mulch either at our garden supplies shop just outside Cambridge, or purchased through our online store.
Raised beds in your garden
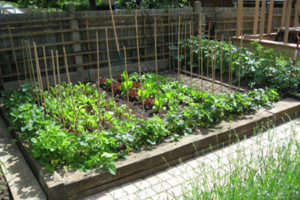 Raised beds are ideal for growing a wide range of plants and are particularly popular for growing fruit and vegetables. The “raised” part means that the soil level in the bed is higher than the surrounding soil, and “bed” implies a size small enough to work without actually stepping into the bed. The bed should be no wider than 4 feet, but length can be whatever suits the site or the gardener’s needs.
Raised beds can be advantageous in many ways including:
- Introducing a different soil type into the garden
- Improving drainage
- Improved access
- Improved soil temperature
You can grow almost any plant in a raised bed but here are some of the favourites:
- Vegetables
- Soft fruits such as strawberries
- Ericaceous plants such as rhododendrons, heathers and camellias
- Small trees and shrubs and many more!
Building your raised bed
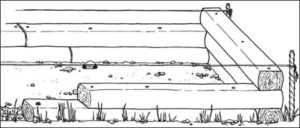 Decide on the size of bed you would like. In this guide we are going to build our raised bed with railway sleepers, a great choice as they are durable and extremely strong. Reclaimed sleepers come in a standard size of 2600mm x 200mm x 100mm. Alternatively you can use new softwood sleepers which are also 2400mm x 200mm x 100mm. Sleepers are very stable when laid flat on their wide side and usually only require minimal amounts of fixings to keep them in place, alternatively you can lay them on their edge to decrease the wall width overall increasing the bed size and gaining more height thus cutting down on the amount of sleepers you will need. You will need to sufficiently fix the sleepers to each other and an internal wooden post to avoid collapse!
Start off by clearing the existing vegetation and level the ground. Any sub soil you remove can be kept and recycled by filling in the bottom of your new raised bed. If there is a large amount of vegetation you can use an off the shelf weed killer such as Roundup to get you started but once applied this should be left for 1-2 weeks to work effectively.
Mark the beds out with a retaining stake in each corner and sides if the beds are large. Using some string line will help in keeping the sides straight.
Cut your sleepers to length and cut the ends to overlap at the corners to increase stability. Please see diagram below.
Lay the first sleepers onto the ground, screwing through the retaining spikes into the sleeper. You can use our Torxfast screws for this as they are self-cutting so no pilot hole is needed.
Keep laying sleepers until the desired height is reached, overlapping on the corners and fixing each sleeper to the retaining spike, for added stability you can use large Timberlock screws to drill through a sleeper into the one underneath.
Line the bed sides with polythene to stop preservative from the sleeper leaching into the soil.
It is advisable to put a layer of rubble or stones at the bottom of your bed to promote drainage, you can use a porous weed membrane to separate the stones from the new soil you will be putting into your bed.
Now it’s time to fill your new bed up with compost!
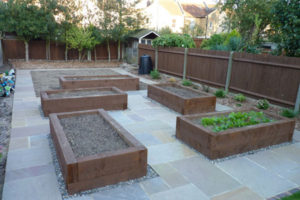 The bonus of using raised beds is that you can choose the soil that will best suit your plants. If you plan an alpine bed, or a bed for plants that like limey soil, prepare the bed accordingly. As a general rule, smaller raised beds are likely to lose soil nutrients sooner. Ideally, a mix of 50 per cent top soil or loam and 50 per cent peat based or peat substitute compost should give you good results in the first year. Our own product Denise’s Delight is a great choice for raised beds as it is a 50/50 blend of Black Fen top soil and well-rotted horse manure.
The bed may need topping up with soil/compost again in 12 months. After a year, adding a top dressing of liquid feed or fertilizer should keep nutrients to a good level. To improve moisture holding in the bed, apply a mulch of bark chippings. These will also rot down over time enriching the soil. The soil in the bed will take time to settle and will need topping up – this settlement could take a few years in high raised beds, so just plant annuals or vegetables to start with and leave permanent planting for later.
All the garden supplies mentioned in this article, including reclaimed and new railway sleepers, are available from our shop in Coton, Cambridge. Please call in to browse our other products or you can order online or by phone.
Back to blog

